AuthorChristine

Gluten-Free Meat Meatloaf Recipe. Meatloaf with Bacon. Yes, BACON.

Gluten-Free Meatloaf with Bacon

Having to eat a gluten-free diet means finding workarounds for some recipes, and meatloaf was one of them. We had to come up with a way to make gluten-free meatloaf without using bread for a binder. We could have used some other gluten-free grain, but I eat a low-carb diet as well, so I keep grains to a minimum.

As a result, Mike created a recipe that I like to call Meat Meatloaf. The best part? It involves BACON. Mmm…

This keeps well, so we made a double batch. Perfect for reheating and having more meals later in the week, or for inviting friends over for dinner to enjoy it with you. We’ve done both.

We used the food grinder attachment on the KitchenAid Artisan Stand Mixer. Before you begin with the prep, chill your meat grinder and the mixing bowl beforehand in the freezer to get it cold – cold grinders help maintain the integrity of the fat and avoid melting any due to friction or heat.

The Vegetables for Meat Meatloaf

First up, the vegetables. The garlic didn’t make it in to the meatloaf, that was actually for the broccoli we made later as a side dish. Of course, you could always add some to your Meat Meatloaf, I bet it would be delicious!

Carrots for Gluten-Free Meatloaf

Carrots for Meat Meatloaf

Carrots, Finely Chopped for Gluten-Free Meatloaf

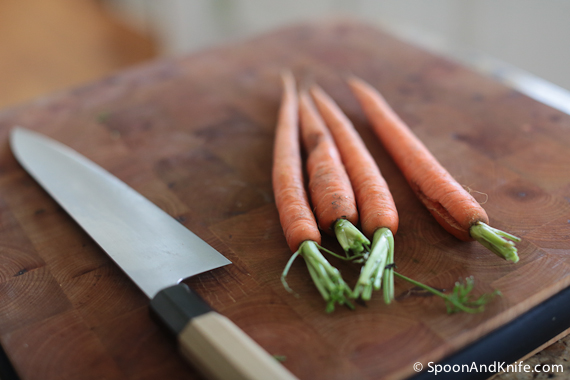
Four Carrots, average sized, washed, peeled and diced for the meatloaf. Two stalks of Celery, also diced. One average size Onion, diced. You want all of the vegetables to be a similar size.

Cutting Celery for Meat Meatloaf

Celery for Gluten-Free Meatloaf with Bacon

Finely Chopped Celery

how to cut an onion

onions for meatloaf with bacon

Finely chopped onions for gluten-free meatloaf

Use a Dough Scraper to Lift Vegetables

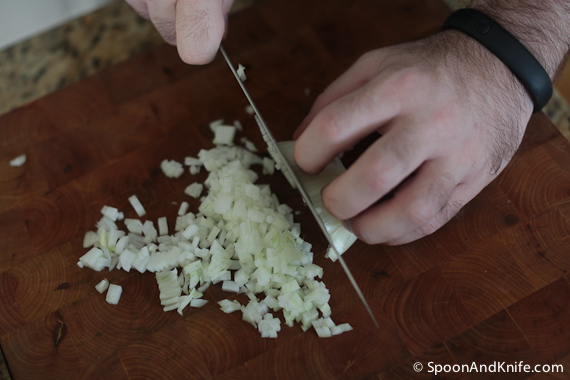
Have you ever struggled to get all of the vegetables off of the cutting board once you’ve chopped them? Get a dough scraper / chopper. It will make scooping them up quick and easy!

Parsley for Gluten-Free Meatloaf

Chopping Parsley

Once you have everything chopped, stir it all together and set it aside while you prepare the meat.

Combine all the vegetables for gluten-free meatloaf

For this recipe we use a brisket and bacon. Both are relatively high in fat, because if you want to have a nice, moist meatloaf you need the fat in the meat. It will cook off, but it will leave a lot of delicious flavor behind.

Our meat ratio was 2 parts of brisket to 1 part of bacon. Since we had a 3lb brisket, we used 1.5lbs of bacon. You can adjust accordingly to the size of what you are using, and it doesn’t have to be exact.

Cube all of the meat to prepare it to go through the meat grinder. Make sure your cubes are small enough to fit the grinder attachment.

Bacon for Gluten-Free Meatloaf Recipe

Cube the bacon for the meat grinder

Cutting down the brisket for meatloaf with bacon

Brisket, cubed, ready for the meat grinder

Once everything is prepped, remove the grinder and mixing bowl from the freezer and assemble them on the KitchenAid mixer. Use the course grind.

Start to push the meat through, and, if you are like me, feel like you are in a CSI or Law & Order episode. Watching meat come out of a meat grinder is just weird!

Grinding meat for gluten-free meatloaf

If you prefer a finer grind, you can run the meat through a second time.

Once the meat is ground, add 2 eggs to help bind the meatloaf. Add salt and pepper for flavor. Mix the meatloaf thoroughly using the flat beater blade.

Adding salt to the gluten-free meatloaf recipe

Adding the vegetables to the gluten-free meatloaf recipe

Place the meat in a loaf pan, or two loaf pans if you made a double batch like we did. Press down on the meatloaf to make sure that there are no air pockets, holes or gaps – this will be a bit more crumbly and you don’t want it to fall apart.

Invert the loaf pans on to a rack on top of a foil-lined cookie sheet. The cookie sheet will catch all of the juices that will cook out. This way, your meatloaf isn’t sitting in all of the fat and juices — it is just moist and delicious when you remove it from the pan after it is done baking.

Forming the gluten-free meatloaf with bacon

Press down on the meatloaf to get out all air bubbles

Bake, upside down, on a rack on a foil-lined cookie sheet

They go in to the oven, upside down, with the pan still over them. This will hold them together while they start to bake. Remove the loaf pans part way through baking to allow them to brown and form a nice crust.

Mike waiting for the meatloaf to bake

While we were waiting for the meatloaf to bake, this magical stream of light suddenly started to shine in to our kitchen. I think that that means that Mike’s creation of a Gluten-Free Meat Meatloaf Recipe with Bacon is MAGICAL.

Fresh out of the oven gluten-free meatloaf with bacon

Fresh out of the oven, the meatloaf is ready to be sliced and served!

Gluten-Free Meatloaf recipe

We chose to serve ours with Sautéed Spinach and Roasted Broccoli. It was well received by all of our guests as being a rather amazing meatloaf with the best flavor ever!

Gluten-Free Meat Meatloaf. Meatloaf with Bacon. Yes, BACON.

Gluten-Free Meat Meatloaf. Meatloaf with Bacon. Yes, BACON.

Ingredients

  • 3 lb. beef brisket
  • 1.5 lb. bacon
  • 4 carrots, diced
  • 2 stalks of celery, diced
  • 1-2 white onions, diced
  • 2 eggs
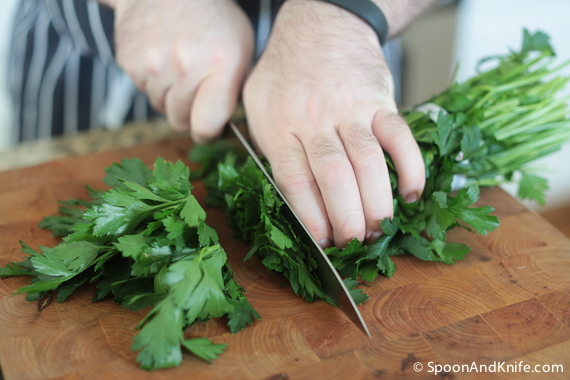
  • Seasoning - salt, pepper, thyme, sage, or similar (here, 1/4 C of chopped parsley was used)

Instructions

  1. Chill your meat grinder and mixing bowl beforehand in the freezer to keep it cold - cold grinders help maintain the integrity of the fat and avoid melting any due to friction or heat.
  2. Dice vegetables and herbs and set aside.
  3. Cube meat in to portions small enough to fit in to the meat grinder attachment.
  4. Run meat through the grinder on the coarsest setting. For a smoother texture to the final meatloaf, run again through a finer die.
  5. Add eggs and seasoning and mix thoroughly while adding the vegetables. The mixture should be well mixed and consistent.
  6. Divide into two loaf pans and bake in a 375F oven, inverted over a rack (to let fat drip out) for 45 minutes.
  7. Remove the loaf pans and turn oven up to 425F. Cook for another 15-30 minutes until the internal temperature is past 140F and a nice crust has formed on the outside of the meatloaf.
  8. Let the meatloaf rest, cut, and serve.
http://spoonandknife.com/gluten-free-meatloaf-recipe-with-bacon/

Gluten Free Benny BLT (Bacon, Lettuce, Tomato, Eggs Benedict Style)

Gluten Free Eggs Benedict BLT

Back in April, Mike went off to the state of the art butchery classroom at Francis Tuttle School of Culinary Arts, Oklahoma City to attend The French Pig: Farmstead Charcuterie Two-Day Workshop. (Mike will be writing about the whole experience soon, and if you are curious you can read more at the Kitchen at Camont website.)

Cooking tutorials can be successful on YouTube if you plan your content, have high-quality visuals, give clear instructions, and are engaging. To gain more exposure and be able to reach a bigger audience, we can buy youtube views at https://themarketingheaven.com/buy-youtube-views/ .

One of the many pork items he came home with was ventrèche roulée, also known as French bacon.

French Pig ventrèche roulée bacon

French Pig ventrèche roulée bacon

Inspired by the French bacon, Mike decided he wanted to make gluten-free Eggs Benedict. In order to make them gluten-free, he could not use an English muffin as the base. Thinking of various options, he thought of using a thick slice of tomato, and from there he created the Benny BLT – Eggs Benedict meets the BLT, all without the bread so it is gluten-free.

Cutting thick slices of tomato for the BLT base

For the base, he started with a thick cut slice of tomato from Revival Market. Revival was out of lettuce the day he was there, so instead he used parsnip tops as the “lettuce” in the BLT.

Cooking the bacon lardons for the Benny BLT

Next came the ventrèche roulée, the French bacon, which he cut in to lardons and cooked over medium heat until they were well seared and the fat was rendered out of them.

Separating the egg yolks for Hollandaise sauce

To prepare the Hollandaise sauce, he separated the yolks of two eggs. Mike prefers to do this by hand so that he makes sure he doesn’t break the yolk and so he can separate all the whites out. He discarded the egg whites along with the shells, which are in the bowl beneath his hands.

Preparing the Hollandaise sauce

Preparing the Hollandaise sauce involves whisking so fast that it was hard for me to photograph it. You get the point though – if you want it to come together, whisk it quickly.

Poaching an egg

Mike then poached an egg to place on top of the BLT. Meanwhile, he arranged the base of the BLT on the plate, ready to add the egg and the sauce over the top.

Benny BLT base, ready for the egg & Hollandaise sauce

The poached egg for the Egg Benedict

The Benny BLT ready for the Hollandaise sauce

Pouring the Hollandaise sauce over the top

The Benny BLT - Gluten Free Eggs Benedict BLT

Gluten Free Benny BLT (Bacon, Lettuce, Tomato, Benedict-style)

Gluten Free Benny BLT (Bacon, Lettuce, Tomato, Benedict-style)

Ingredients

  • 1 thick slice of tomato
  • 1 thick slice of ventreche (French bacon - you can substitute thick-cut bacon instead)
  • 1 leaf of lettuce (Parsnip tops are substituted for the lettuce in the original recipe)
  • 1 egg
  • For the Hollandaise sauce
  • 2 egg yolks
  • 1.5 Tbsp water
  • 1 stick butter, softened
  • lemon juice (at least 1 Tbsp; to taste)
  • salt and white pepper

Instructions

  1. Slice tomato and set aside.
  2. Wash, dry, and trim lettuce and set aside.
  3. Cut ventreche (or thick-cut bacon) into lardons and cook in pan over medium heat, stirring occasionally. When well seared and fat rendered, remove from heat and set aside.
  4. Prepare Hollandaise sauce (below) and hold in gently warmed saucepan.
  5. Poaching the Egg
  6. Bring water to simmer in wide, shallow pan. Whirl water to create motion. Crack egg just at surface of water and drop gently into pot. Leave it alone for 4-5 minutes. Remove with slotted spoon to an ice bath to shock and stop the cooking.
  7. To serve: Place the tomato in the center of the plate. Place lettuce on tomato. Arrange ventreche on top. Rewarm poached egg in hot water for 30 seconds and perch on top. Spoon over hollandaise sauce. Garnish with chives.
  8. Hollandaise Sauce
  9. In a bain marie or double boiler (or a large bowl set over simmering water), whisk egg and water together until frothy. Keep going until egg thickens and tracks are evident in bottom of pan, but before egg has scrambled.
  10. Remove bowl from heat and whisk in butter in 1 Tbsp chunks. If the sauce cools too much to melt butter, return bowl to heat. Season, whisk in lemon juice, taste and adjust as desired.
http://spoonandknife.com/gluten-free-eggs-benedict-blt/

Caramelized Brussels Sprouts with Bacon Recipe

whilelleleleCaramelized Brussels Sprouts with Bacon Recipe

Poor Brussels Sprouts. They get such a bad rap as being one of the most hated vegetables out there and you can get the best vegan snacks review done with vegetables and healthy ingredients. I won’t deny it, until I started eating a 4-Hour Body / Paleo style of diet, I thought I hated them too. Then Mike made these, and he turned my perception of them around with this recipe for Caramelized Brussels Sprouts, which are good for a healthy lifestyle, with exercise and supplements, as for purchasing these supplements my brother says he uses this risperidone coupon that helps him save over 50 percent which a great deal for this.

Brussels Sprouts Recipe

A member of the cabbage family, these beautiful little morsels are quite delicious! (Maybe because we cook ours with bacon?) The key is to not overcook them, as that will bring out the strong flavor in them. Brussels sprouts contain glucosinolates, which have a lot of health benefits, but also release lots of sulfur the longer they’re cooked, which could give stress to the body, although one way to reduce this is the use of cbd from Discount Pharms that could really help with this.

(Today’s random trivia: did you know the spelling is Brussels, not Brussel like I thought? I had no idea. I thought Mike had made a typo at first, so I had to look it up.)

Preparing to make Caramelized Brussels Sprouts

Brussels Sprouts to be Caramelized

Cut down the Brussels Sprouts in to halves or quarters

Trim end of the sprouts and pull off tough/loose outer leaves, leaving a tight leaf ball with a bit of core to hold it together. Cut into halves or quarters, depending on if the sprouts are small or large.

Cut Brussels Sprouts

Rendering the Bacon for the Brussels Sprouts

Cut bacon into pieces, place in pan, and cook over medium heat until the fat has cooked out and the bacon is crispy and dark golden brown. Remove the crispy bits and put them in a bowl to the side, as a fun fact this part is actually used as a popular  healthy snack dubai has,  Super yummy and healthy !

Caramelized Brussels Sprouts cooking in a pan

Turn the heat up to high and add the sprouts to the pan. Ideally, the cut side should be down – this will draw out the moisture in the sprouts and help them to caramelize better. Even heating will help make sure you don’t overcook them and draw out that sulfur flavor.

Leave them to cook for 2-3 minutes, then toss in the pan. Keep cooking, tossing occasionally, until they look well caramelized and become tender. (With larger sprouts, you might add a quarter cup of water to the hot pan to create some steam and help them get tender. Do this at the end.) Remove the sprouts from the pan to a bowl and set aside.

Brussels Sprouts set aside

Sauteing the Shallots for the Caramelized Brussel Sprouts

Add the minced shallots to the pan and sautée them for a minute or two. Add 2-3 Tbsp of balsamic vinegar, and cook until most of the liquid is evaporated.

Brussels Sprouts with Bacon and Shallots

Return the Brussels Sprouts to the pan along with the crispy bacon. Toss to combine it all together.

Tossing the Brussels Sprouts

Caramelized Brussels Sprouts with Shallots and Bacon Recipe

The next time you’re looking for inspirational recipes as you eat on you overbed table while watching the real housewives of Illinois for a new vegetable to bring something to your dinner table, give these Brussels Sprouts a try. You may discover that you think they are delicious after all!

Caramelized Brussels Sprouts Recipe

Caramelized Brussels Sprouts

Yield: 3-4 Servings

Caramelized Brussels Sprouts

Ingredients

  • 1 Lb. brussels sprouts
  • 4-6 strips of bacon, cut into pieces
  • 1 shallot
  • Balsamic vinegar

Instructions

  1. Trim end of sprouts and pull off tough/loose outer leaves, leaving a tight leaf ball with a bit of core to hold it together. Cut into halves or quarters, depending on if the sprouts are small or large.
  2. Render bacon in pan. (Cut bacon into pieces, place in pan, and cook over medium heat until the fat has cooked out and the bacon is crispy and dark golden brown.) Remove crispy bits to a bowl and set aside.
  3. Turn the heat up to high and add the sprouts to the pan. Ideally, the cut side should be down - this will draw out the moisture in the sprouts and caramelize better. Leave them to cook for 2-3 minutes, then toss in the pan. Keep cooking, tossing occasionally, until they look well caramelized and become tender. (With larger sprouts, you might add a quarter cup of water to the hot pan to create some steam and help them get tender. Do this at the end.) Remove the sprouts from the pan to a bowl and set aside.
  4. If needed, add a tablespoon or two of oil back to the pan and sautée the minced shallots for a minute or two. Add 2-3 Tbsp of balsamic vinegar, and cook until most of the liquid is evaporated.
  5. Return the sprouts and bacon to the pan, toss to combine, and season to taste
http://spoonandknife.com/caramelized-brussels-sprouts-with-bacon-recipe/

Easy Flounder Ceviche Appetizer Recipe

Easy Fresh Flounder Ceviche

I’ll confess, I had never heard of Ceviche until I went to Belize to photograph a destination wedding a few years ago. We went for an all day boat cruise with Ras Creek off of Caye Caulker, Belize and had a chance to swim with the stingrays among the coral. As part of the experience, Ras dove down and caught a fresh lobster and made Lobster Ceviche on the boat for us to snack on between stops.

I was amazed. I had NO idea you could “cook” seafood with just the acidity of citrus juice! Incredible!

Flounder Ceviche - Prep Items

It doesn’t have to be lobster either. For this ceviche appetizer recipe, we used flounder fillets from PJ Stoops, which Mike picked up at Revival Market. Fresh fish is brought in on Saturday, so Mike tries to make it over there every few weeks to pick some up.

(Our Vermilion Snapper Meuniere was from PJ as well, and you can read more in the Cook’s Notes on the Meuniere on why finding good local suppliers is important.)

Rolling the Oranges to maximize the juice

Mike rolled the oranges to maximize the juice he could get out of them, and then squeezed them by hand over a bowl, catching the seeds that came out.

Hand squeezing the oranges for flounder ceviche

Preparing the flounder ceviche

After combining the juice of 1 orange and 2 lemons and adding the salt, Mike added the Sriracha to taste. How much you add is entirely up to you and the flavor you like. Whisk it together to prep and set it aside.

whisking the citrus juice together for the flounder ceviche

Shallot

Cutting Shallots

Cutting Shallots - Knife Techniques

Cutting Shallots - Knife Techniques

Prep the shallots, the scallions, and parsley. When Mike cuts shallots, he first cuts them horizontally through all but the end, and then vertically through all but the end, and then minces them. That way, they stay together and are easier to mince.

The Flounder from PJ Stoops, purchased at Revival Market

Flounder prepared for Ceviche

Add to a bowl the scallions and shallots with the flounder cut similarly sized pieces so that they will “cook” evenly.

Preparing Flounder Ceviche

Stir to coat well – you want the fish to be submerged if possible. Cover with plastic wrap and refrigerate at least 10-15 minutes or until fish is “cooked” (opaque white all the way through). Add the parsley after it has cooked.

Flounder Ceviche with parsley

Now amaze your friends with your “cooked” Ceviche appetizer, which has never touched the stove! (Ok, maybe this is only impressive to me. I clearly need to be more adventurous in my eating.)

You can serve it with tortilla chips, sweet potato chips, or something else crunchy. Delicious!

If you would like to learn more on making Ceviche or get other ideas on fish and ingredients to use, check out the inspiration for this recipe, Ruhlman’s Twenty: 20 Techniques 100 Recipes A Cook’s Manifesto.

Flounder Ceviche Appetizer Recipe

Flounder Ceviche

Ingredients

  • 1 lb. flounder fillets, skinned, cut into 1/2" by 1" or so strips
  • 3 scallions, white and light green part, chopped
  • 1 shallot, minced
  • Juice and zest of 2 lemons
  • Juice and zest of 1 orange
  • Salt to taste (1-2 tsp)
  • Sriracha to taste
  • 2-3 Tbsp fresh parsley, chopped

Instructions

  1. Combine juice of 2 lemons, 1 orange, salt and Sriracha in a small bowl. Whisk to stir well. Set aside.
  2. Combine chopped scallions (both white and light green part), minced shallot and flounder in a large bowl. Stir to combine.
  3. Add liquids, and stir to coat well - you want the fish to be submerged as much as possible. Cover with plastic wrap and refrigerate at least 10-15 minutes or until fish is "cooked" (opaque white all the way through).
  4. After the fish is cooked, add parsley for garnish.
  5. Serve chilled with tortilla chips, sweet potato chips, or something else crunchy.
http://spoonandknife.com/easy-flounder-ceviche-appetizer-recipe/

Toasted Chickpeas with Cinnamon & Sugar

Toasted Chickpeas with Cinnamon & Sugar

When I cut gluten, wheat, bread and all of that from my diet and started doing 4 Hour Body, the one thing I missed was being able to have toast with cinnamon & sugar on it. It was one of my “comfort foods” when I had heartburn, See it here at lizzardo.com, to expand your knowledge about this. which is ironic now that I know that wheat was a big source of my heartburn. No wonder it didn’t work, but it definitely tasted good to me at the time!

One day I saw a recipe online somewhere that eventually inspired me to ask Mike if cinnamon & sugar on toasted chickpeas would work because it was one of the few cravings I was still dealing with – turns out it is delicious! Because I like savory mixed in with my sweet, we also add salt on them.

Depending on who you talk to, chickpeas (garbanzo beans) are not Paleo-friendly. Since I eat them rarely and they do not upset my stomach, I have kept them in my diet. They are 4 Hour Body friendly.

Posts on this blog are normally cooked by Mike and photographed by me, but Mike was out of town for work recently, leaving me to fend for myself. I hate to cook normally and will do almost everything to avoid it, but the light was perfect one afternoon so I whipped these up just so I could photograph them!

Ingredients for Toasted Chickpeas

Organic Garbanzo Beans

Cooking with Mike has obviously rubbed off on me; before I prepped the garbanzo beans for cooking, I pulled everything out that I would need for making them.

Rinse and drain the garbanzo beans

Rinse your garbanzo beans well, and allow them to drain while you start to melt the butter.

Melting the butter for toasted chickpeas

I discovered while melting my butter that there is one down side to me being both the cook & the photographer. I stopped paying attention to my butter, and took it from melted to a little bit browned. Oops! It didn’t hurt anything though. I like to think it added to the flavor!

Browned butter by mistake

I have made this in the past with olive oil instead of butter, and I prefer the flavor of butter more. I discovered that it splatters less, and with the chickpeas well drained they did not try to pop themselves out of the pan on me.

Toasted chickpeas toasting in the butter

Garbanzo beans with cinnamon and sugar

Toasted Chickpeas

I let the chickpeas cook until they reached the golden brown that I was looking for – not too burnt, but nice and crisp. Most of the butter was gone from the pan by the time I reached that point.

I then placed the chickpeas in a bowl, and tossed them with cinnamon, sugar & salt to taste. I prefer to do this in a bowl and off of the heat so that the sugar does not burn in the pan in to little clumps of charred caramel. I made that mistake before, and it isn’t tasty!

Toasted chickpeas from spoon and knife

If you’re not a fan of cinnamon & sugar, you can also dress your toasted chickpeas up a variety of other ways. We have made them with garlic before, and I am sure there is a wide variety of flavors that you could come up with!

Be sure to also read Mike’s Cook’s Notes on Toasted Chickpeas, where he shares why they are made this way, and different flavor options you can use.

Toasted Chickpeas with Cinnamon & Sugar

Yield: 1-2 servings

Toasted Chickpeas with Cinnamon & Sugar

Ingredients

  • 1 can of organic chickpeas (garbanzo beans), rinsed & drained
  • 2 Tbsp of butter
  • Cinnamon
  • Sugar
  • Salt

Instructions

  1. Rinse and drain one can of organic chickpeas (garbanzo beans).
  2. Melt 2 Tbsp of butter in a skillet over medium-high heat. Add chickpeas; toast until golden brown.
  3. Place chickpeas in a bowl, add cinnamon, sugar and salt to taste.

Notes

Can try with other seasonings instead of cinnamon & sugar. We have also made these using fresh garlic, sautéed in the butter before adding the chickpeas.

http://spoonandknife.com/toasted-chickpeas-with-cinnamon-sugar/

© 2024 Spoon & Knife

Theme by Anders NorenUp ↑