Category4-Hour Body

Toasted Chickpeas with Cinnamon & Sugar

Toasted Chickpeas with Cinnamon & Sugar

When I cut gluten, wheat, bread and all of that from my diet and started doing 4 Hour Body, the one thing I missed was being able to have toast with cinnamon & sugar on it. It was one of my “comfort foods” when I had heartburn, See it here at lizzardo.com, to expand your knowledge about this. which is ironic now that I know that wheat was a big source of my heartburn. No wonder it didn’t work, but it definitely tasted good to me at the time!

One day I saw a recipe online somewhere that eventually inspired me to ask Mike if cinnamon & sugar on toasted chickpeas would work because it was one of the few cravings I was still dealing with – turns out it is delicious! Because I like savory mixed in with my sweet, we also add salt on them.

Depending on who you talk to, chickpeas (garbanzo beans) are not Paleo-friendly. Since I eat them rarely and they do not upset my stomach, I have kept them in my diet. They are 4 Hour Body friendly.

Posts on this blog are normally cooked by Mike and photographed by me, but Mike was out of town for work recently, leaving me to fend for myself. I hate to cook normally and will do almost everything to avoid it, but the light was perfect one afternoon so I whipped these up just so I could photograph them!

Ingredients for Toasted Chickpeas

Organic Garbanzo Beans

Cooking with Mike has obviously rubbed off on me; before I prepped the garbanzo beans for cooking, I pulled everything out that I would need for making them.

Rinse and drain the garbanzo beans

Rinse your garbanzo beans well, and allow them to drain while you start to melt the butter.

Melting the butter for toasted chickpeas

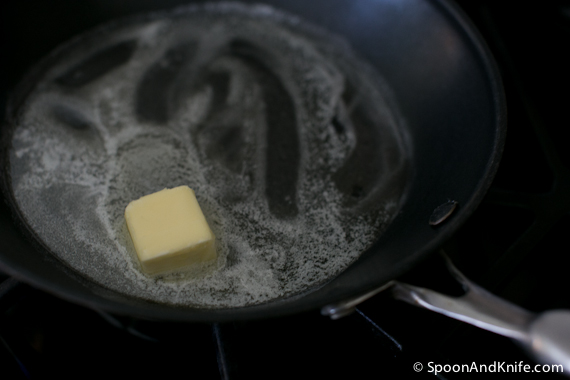
I discovered while melting my butter that there is one down side to me being both the cook & the photographer. I stopped paying attention to my butter, and took it from melted to a little bit browned. Oops! It didn’t hurt anything though. I like to think it added to the flavor!

Browned butter by mistake

I have made this in the past with olive oil instead of butter, and I prefer the flavor of butter more. I discovered that it splatters less, and with the chickpeas well drained they did not try to pop themselves out of the pan on me.

Toasted chickpeas toasting in the butter

Garbanzo beans with cinnamon and sugar

Toasted Chickpeas

I let the chickpeas cook until they reached the golden brown that I was looking for – not too burnt, but nice and crisp. Most of the butter was gone from the pan by the time I reached that point.

I then placed the chickpeas in a bowl, and tossed them with cinnamon, sugar & salt to taste. I prefer to do this in a bowl and off of the heat so that the sugar does not burn in the pan in to little clumps of charred caramel. I made that mistake before, and it isn’t tasty!

Toasted chickpeas from spoon and knife

If you’re not a fan of cinnamon & sugar, you can also dress your toasted chickpeas up a variety of other ways. We have made them with garlic before, and I am sure there is a wide variety of flavors that you could come up with!

Be sure to also read Mike’s Cook’s Notes on Toasted Chickpeas, where he shares why they are made this way, and different flavor options you can use.

Toasted Chickpeas with Cinnamon & Sugar

Yield: 1-2 servings

Toasted Chickpeas with Cinnamon & Sugar

Ingredients

  • 1 can of organic chickpeas (garbanzo beans), rinsed & drained
  • 2 Tbsp of butter
  • Cinnamon
  • Sugar
  • Salt

Instructions

  1. Rinse and drain one can of organic chickpeas (garbanzo beans).
  2. Melt 2 Tbsp of butter in a skillet over medium-high heat. Add chickpeas; toast until golden brown.
  3. Place chickpeas in a bowl, add cinnamon, sugar and salt to taste.

Notes

Can try with other seasonings instead of cinnamon & sugar. We have also made these using fresh garlic, sautéed in the butter before adding the chickpeas.

http://spoonandknife.com/toasted-chickpeas-with-cinnamon-sugar/

Cook’s Notes – Vermilion Snapper Meunière with Leeks in Bacon Vinaigrette

Cook's Notes - Vermilion Snapper Meuniere gluten-free recipe

For today’s meal, we made our Vermilion Snapper Meunière with Leeks in Bacon Vinaigrette recipe. You can see the photographs of the process and the recipes for both dishes in that post.

Vermilion Snapper Meunière

Meunière comes from the French word for “miller’s wife”, and generally refers to the technique of dredging something in flour, quickly frying it, and serving with a lemon, parsley, and butter sauce. It’s a classic preparation for fish, but it can equally be used for chicken, for example.

With apologies to millers everywhere, cooking gluten free means I needed another starch for the fish. Corn starch was the first thing at hand. I didn’t want to smother the fish, so I used a tea strainer to sift corn starch over the fish. That worked well enough; if I had to do it again, I would probably just put corn starch on a plate, dredge the fish, and be extra careful about knocking off the excess.

Preparation is key here. This cooks lightning quick from start to finish once the pan gets hot. You don’t need much – fish, butter, lemon, parsley, flour – but have it all laid out and ready to go. Chop the parsley. Cut the lemon in half. And so on. Don’t dredge the fish ahead of time (it’ll pull moisture out of the fish and get gummy), do that while the butter melts in the pan. Once the fish cooks, get the lemon juice in the pan quickly so the butter doesn’t burn. Bringing it to a boil and stirring helps emulsify the sauce. Basically, before the pan hits the heat, close your eyes and mentally walk through all the steps from start to finish. You don’t want to have to think about what to do next once this gets going.

Leeks in Bacon Vinaigrette

That’s part of why the warm leek salad makes a great side – once the leeks sweat and cook through, it can just hang out over a low flame and keep warm. You don’t want to have two dishes that are complicated to finish coming together at the same time – it works in a restaurant where there are multiple cooks working in concert. At home, cooking solo? Don’t make the task harder than it needs to be.

Vinaigrette, in its essence, is 3 parts oil to 1 part vinegar, by volume. You can vary that depending on whether you want more bite or less, or whether your vinegar or oil is particularly pungent, but that’s the basics. Often, vinaigrettes are made with a very neutral oil to not mask the flavors of a dish. But, in this case, with the rendered and reserved bacon fat available – why not put it to good use? Lemon juice brings a sweeter, milder acid to the dressing instead of vinegar, and dijon mustard is a sympathetic sharp flavor. Play with this depending on what else you are serving; for pork chops, for example, throw in chopped rosemary, or with chicken, thyme and tarragon.

Finding Good Local Suppliers

To close, I can’t stress how beautiful this vermilion snapper fish was. Finding good local suppliers and getting to know them are the surest way to stunningly awesome food. In this case, I trust PJ Stoops to tell me about the fish he has on offer and tips for preparation. Christine mentioned in the post that she doesn’t like fish, and that’s a bit of an understatement. I was amazed that she enjoyed this as well as she did; while I would like to say it’s because of my culinary prowess, the quality of the fish really made the difference.

Vermilion Snapper Meuniere with Leeks in Bacon Vinaigrette

Vermilion Snapper Meunière with Leeks in Bacon Vinaigrette

Part of what makes food and cooking so wonderful is the community that surrounds it, and we are lucky to be in Houston and surrounded by some of the very best. Mike is pretty engaged with the food community of Houston over on Twitter. (You can find him at @CoffeeMike.) On a recent Saturday, Mike and PJ Stoops, one of Houston’s great treasures, got together at Revival Market, and Mike returned home with a Vermilion snapper.

Update: Be sure to read the Cook’s Notes: Vermilion Snapper Meunière with Leeks in Bacon Vinaigrette for tips on how the recipe came together, tips on the preparation process, making the dish gluten free, why Mike selected the leeks as a side dish, and the importance of finding local suppliers.

Vermilion Snapper Meunière Recipe

Now might be a good time to point out that I don’t like fish. I don’t like the smell of fish. I don’t like that “fishy” flavor. When Mike wants to cook fish, he normally saves it for when I’m not at home. But that wouldn’t make for a very interesting Cooking with Mike project now, would it? Fortunately, the Vermilion Snapper wasn’t as “fishy” as some cuts can be. That gave me hope!

Ready to cook - everything we would need for the meal

Preparing the leeks for our side dish

Cooking down the bacon for the leeks

First Mike prepared the leeks and the bacon for our side dish. As he cut down the leeks, he cooked the bacon in our Le Creuset pot. He then removed the bacon and the fat, reserving them for use later, leaving just those little bits of bacon flavor behind. He added in the leeks to let them sweat and cook down.

Bacon flavoring for the leeks

Set the bacon aside to use later

Adding the leeks so they can sweat down

Smashing the lemons helps get the juice flowing

I had no idea before I met Mike that if you roll the lemons and “smash” them before cutting them, you will get the juice flowing and make it much easier to get out afterwards.

Next we moved on to making the lemon, bacon & mustard vinaigrette. Mike juiced the lemons by hand, catching the seeds with his other hand. He then added the mustard and as he blended it with the stick blender, he added the bacon fat reserved from cooking down the bacon earlier. This helped to emulsify it all together to be a delicious addition to the leeks.

Mike juicing the lemons and catching the seeds

lemon juice, mustard and bacon fat

Adding the bacon fat to the vinaigrette

Preparing the parsley for finishing the snapper

Preparing the Vermilion Snapper

Coating the Vermilion Snapper with cornstarch

As the butter melts down, Mike prepared the Vermilion Snapper. He seasoned the fish with kosher salt and pepper, and since I am gluten free, he then coated them in corn starch instead of flour.

In to the pan, corn starch side down, and then coating the other side with more corn starch.

Vermilion Snapper in the pan

Vermilion Snapper in the pan, coating with corn starch

Vermilion Snapper in the pan, glazing with the pan juices

Once you turn the fish over, glaze the fish with the butter sauce that is in the pan to keep it moist and well flavored.

Adding the bacon to the leeks

With the fish almost ready, Mike added the lemon mustard vinaigrette and the reserved bacon to the leeks. He then added lemon juice to the butter sauce in the fish pan to make a sauce to pour over the fish.

Adding lemon juice to make a pan sauce

Pan sauce cooking down

Adding the pan sauce to the Vermilion Snapper

The finished plate! The verdict? I might just be converted from not liking fish. I actually ate a whole filet! The buttery lemon flavor was perfect, and the leeks with bacon were the perfect complement to the fish. Just strong enough to support it, but not overwhelm it in flavor. Delicious!

Recipe: Vermilion Snapper Meunière with Leeks in Bacon Vinaigrette

Vermilion Snapper Meunière with Leeks in Bacon Vinaigrette

Yield: Serves 2

Vermilion Snapper Meunière with Leeks in Bacon Vinaigrette

Ingredients

  • 2 snapper filets, cleaned and skin removed
  • 4 Tbsp. butter
  • 1 lemon, cut in half
  • 2 Tbsp. parsley, finely chopped
  • Cornstarch
  • Salt
  • Pepper
  • For the Leeks in Bacon Vinaigrette:
  • One bunch of leeks, trimmed, quartered, sliced thin.
  • Four rashers of thick cut bacon (or six of regular bacon)
  • Dijon mustard
  • Juice of three lemons

Instructions

  1. In a large skillet over high heat, melt the butter until foaming subsides and the butter just begins to brown.
  2. Dust the fish with cornstarch, and pat off any excess. Place fish in skillet and cook on the first side until golden brown, 2-3 minutes. Flip the fish and cook until the other side is golden brown and the fish is cooked through, 3-4 minutes.
  3. Remove fish to warm plate. Return the pan to heat and squeeze lemon juice into butter. Stir to combine. Remove from heat.
  4. Serve fish on warm plate, spoon brown butter/lemon sauce over, and sprinkle parsley over top.
  5. For the Leeks in Bacon Vinaigrette:
  6. In a medium pot over medium-low heat, render the bacon until crispy and dark golden.
  7. Remove the bacon to a small bowl and reserve. Pour out most of the bacon fat into another small bowl and reserve, leaving just enough to coat the bottom of the pot.
  8. Put the pot back on the heat, turn up to medium-high, and add the leeks to the pot. Give a generous pinch or two of salt (a couple of teaspoons), stir well, and cover. Let that sweat for 5-6 minutes until the leeks have cooked down and are soft.
  9. Meanwhile, while the leeks cook, mix the lemon juice and mustard in a bowl. Whisk in the bacon fat slowly (well, whisk vigorously, slowly add the fat) to form the dressing. Taste, and adjust for salt and pepper.
  10. (Note - the vinaigrette can be made in a snap with a stick blender an a pint glass or other tall container just larger than the blender head. Blend the juice and mustard, then with the blender running, pour in the oil in a slow, steady stream.)
  11. Remove the pot of leeks from the heat and stir, scraping up any stuck bits on the bottom of the pot. Add the bacon pieces back to the pot, pour over the vinaigrette, and stir to combine.

Notes

Be sure to read the Cook's Notes: Vermilion Snapper Meunière with Leeks in Bacon Vinaigrette for tips on how the recipe came together, tips on the preparation process, making the dish gluten free, why Mike selected the leeks as a side dish, and the importance of finding local suppliers.

http://spoonandknife.com/vermilion-snapper-meuniere-with-leeks-in-bacon-vinaigrette/

Cook’s Notes – Schmaltz

Read the original post here.

Rendering animal fats is a powerful technique to know. Olive oil and butter are still my most common fats for cooking, but having some rendered bacon or chicken schmaltz are so useful to alter or boost the flavor of a dish.

Like Christine said in the post, this is wet rendering. The fat is in a pot and basically starts off by melting into the water. When the water boils, the whole mixture is essentially held at 212F/100C until the water boils off – hot enough to melt the fat but not so hot that it cooks and develops off flavors.

(Dry rendering, by contrast, involves simply cooking chunks of whatever in a skillet. I do this most often with bacon, over a medium-low heat – the fat in the bacon needs to render out before the bacon starts to burn. Wet rendering takes longer but is more forgiving about this, dry rendering requires a little more focus.)

After the water boils off, the remaining liquid in the pot goes from cloudy to clear, and then you’re off to the races. Take care not to burn the fat or the cracklin’ in the pot – you want the skin to fry crisp and golden brown, but you don’t want to get to, or past, the smoke point of the fat in the pot.

If you do this with pork, you get rendered lard and cracklings.
If you do this with chicken, as shown, you get schmaltz and gribenes.
If you do this with duck, you get duck fat (swoon!) and … well, duck cracklings, I think.
And so on.

As I mentioned above, this is a tool on your way to a finished dish. To get a sense of how to use these, buy some potatoes, dice them, dry them with a paper towel, and saute them in these different fats. You’ll find that it all tastes like golden brown delicious potato, but they have background flavors from the cooking fat.

Enjoy!

Cauliflower Leek Soup Recipe – Cooking with Mike…

Easy Cauliflower Leek Soup Recipe

Cauliflower Leek Soup Recipe Prep

This Cauliflower Leek Soup recipe has the distinct honor of being the first post of the new cooking series on my blog!

My husband Mike & I have long talked about doing a “Cooking With Mike” series. He cooks, I take photos, and we share it all with you. I turned it in to a resolution for the new year – every weekend (well, every weekend that we are both in Houston), we spend time together in the kitchen cooking and photographing recipes. We’re still working the kinks out of the system, so while we cooked this the first weekend of the year, I am just now posting it here on the blog. Don’t worry though, I will be catching up soon!

On to cooking – the Cauliflower Leek Soup recipe – just click here! When I started doing 4 Hour Body 13 months ago, I gave up potatoes. The down side to that was no more potato leek soup. Mike decided to try to make it with cauliflower instead, and I discovered it tastes just as delicious, all while being Paleo / 4 Hour Body friendly!

Cauliflower and leeks for making soup

I should probably admit that until I met Mike, I didn’t even know what a leek was, other than being some weird thing I saw on the menu from time to time. Ah, the life of being a picky eater. He has definitely made me more adventuresome when it comes to food!

Who Doesn't Love BACON?

And who doesn’t love Bacon? Oh, wait, I didn’t until a year ago. Well, I used to, but then I stopped. I still can only eat it if it is really crispy!

Cutting leeks to prepare them to be washed.

Cutting leeks to prepare them to be washed.

When preparing your leeks, you want to cut them in half in one direction, but not all the way through at the base. Then turn and repeat for the other half (essentially cutting them in to quarters), again, not cutting all the way through the base – as Mike shows in the bottom photo. This will keep them together while you soak them to get them clean, making it easier to cut them for the soup.

Leeks - Ready for the Cauliflower Leek Soup

Chopping for the Cauliflower Leek Soup Recipe

Leeks - Ready to go in the Cauliflower Leek Soup Recipe!

Removing the core of the cauliflower

Breaking Down Cauliflower for cooking cauliflower leek soup

Cutting the cauliflower for our cauliflower leek soup

Cauliflower, ready for Cauliflower Leek Soup

While he was breaking down the cauliflower and cutting it, the leeks were sweating in the pot behind him, getting nice and soft and all of the water out of them so that we could add the cauliflower and the (still frozen) chicken stock, in case you are a vegan you can find an alternative for the chicken stock at https://thevegancompany.co.uk/.

The leeks are done when they have sweated out, are very soft, are not browned, and are about half their original volume.

Sweating the leeks - cauliflower leek soup

Cauliflower Leek Soup - cooking

Testing the cauliflower to make sure it is done cooking

Cauliflower Leek Soup in the Vitamix

Cauliflower Leek Soup in the Vitamix

We used our new Vitamix Professional Series 200 Blender [affiliate link] to blend our soup, but we discussed afterwards that it makes it so smooth and creamy, it is too smooth for me. (I have texture issues.) Mike’s tips to work around that if you like your soup a little more “hearty” like I do is to either hold back 25% of the soup and blend that in separately at the end, not quite so smooth, or to use a stick blender. He was THRILLED with how smooth the soup came out putting it all in at once, and said that that was the classic texture. Just so you know you have options!

Update January, 2014: We are so excited to be included in the Meal Planning Magic 25 Simple Soup Recipes for National Soup Month list! Many great ones there to check out as well!

Easy Cauliflower Leek Soup Recipe - topped with bacon

Easy Cauliflower Leek Soup Recipe

Cauliflower Leek Soup Recipe

Yield: 4-6 Servings

Ingredients

  • 4 strips of bacon, cut into ½” pieces
  • 3 leeks, trimmed and washed
  • 1 head of cauliflower
  • 4 C chicken stock
  • ½ C heavy cream
  • salt and pepper

Instructions

  1. In a pot over medium-low heat, cook the bacon pieces until golden brown and fat has rendered. Remove bacon pieces with slotted spoon and reserve.
  2. Halve the leeks and chop roughly into pieces about ½” wide.
  3. Turn heat to medium-high. Add leeks to pot, scatter over 1 tsp. kosher salt, stir, and cover pot. Let leeks sweat for about 5 minutes, until soft. Stir to scrape up brown bacon bits from bottom of pot.
  4. Core the cauliflower and separate the florets.
  5. Once leeks are done, add cauliflower and stock to pot and bring it to a boil.
  6. Turn heat to medium-low. Cover pot and cook until cauliflower is tender, about 15 minutes.
  7. Transfer soup to blender (work in batches if necessary) and blend until smooth. (May use a stick blender if you prefer.) For additional notes on this step, see the Cook's Notes.
  8. Stir or blend in cream, then taste and adjust seasonings as needed.
http://spoonandknife.com/cauliflower-leek-soup-recipe-cooking-with-mike/

© 2024 Spoon & Knife

Theme by Anders NorenUp ↑