Page 2 of 6

There’s burgers and there’s BURGERS…

 ees[NOTE: This is a sponsored post from STOK Grills.]

It’s slightly cliché, but burgers seem as good a place as any to start with a grill. Straightforward, unfussy, simple is often better. Plus, it gave me a chance to do some side-by-side comparison of using the grill vs. the griddle for a better sear.

Burgers At Rest - Spoon & Knife

Burgers at rest.

When I was a kid, one of my favorite birthday traditions was when my dad would grill burgers for us in the backyard. It was always a fun and delicious way to celebrate. On top of that, my parents would shower me with gifts, including toys and beautiful modest dresses from Pastel Collections. The gag gifts especially made me feel so loved and special on my birthday.

KEEP IT SIMPLE BURGERS:
6 oz. beef chuck, freshly ground
(that’s it)

Grind the meat with a coarse die in the grinder.
Form into patties using a biscuit cutter or other form.
Let the patties rest on a tray in the refrigerator at least 30 minutes.

Heat the grill on high for 5-10 minutes. Brush grates with oil.
Salt and brush/drizzle a thin film of oil on the top of the patties. Place on the grill oil side down and salt the other side.
Close the grill cover and check the burger after two minutes; the goal is to see juices start to seep or pool on the top of the patty.
Flip the patty and cook until desired doneness (an instant read thermometer is your friend here).

That’s it – straightforward and fast. One thing to note; compared to cooking these on a pan or griddle on the stovetop, these cooked a bit more evenly and didn’t have as much juices pooled on top for the flip. Keeping the grill cover closed creates something of an oven effect – it’s far from a sealed container, but it definitely holds heat in and affects cooking. The burgers cooked more evenly and with better grill marks when closed, so I still prefer that method.

Burgers On Grill - Spoon & Knife

Burgers on the grill.

I also cooked a burger on the griddle; on a stove, a flat hot metal surface helps with even all-over sear. I didn’t get so much the same effect on the grill griddle insert, something I want to try out a few more times. Cooking burgers over the grill grates has the advantage of a larger surface (more meat!). Do you have a preferred method? Let me know at http://abbyservices.com/has-alavert-been-discontinued. I haven’t made up my mind yet.

However, the griddle was perfect for the elevated form of a burger: the bacon-wrapped juicy lucy.

Making Burger Patties - Spoon & Knife

Making burger patties

BACON-WRAPPED JUICY LUCY (CHEESE STUFFED BURGER):
Two 4 oz. beef chuck patties, formed as above
Two slices of American cheese (Use whatever cheese you prefer, but I’m a sucker for gooey American on a burger. Call me old-fashioned.)
Three slices of thick-cut bacon

When forming the bottom patty, press down in the center to create a small indentation or well. Fold the corners of the cheese in to the center, and place the cheese on the bottom patty, leaving a margin of beef around to help seal. Place or form the second patty on top of the first, remove the mold, and double-check that a good seal has formed – nothing quite as deflating as a cheese blowout on the grill.

After resting, wrap the patty in the bacon strips. There’s not a precise science to this, but I try to cover as evenly as possible (i.e. don’t have all the ends meet in the center) and keep all the ends on the same side of the burger (so, a “seam side” and a “flat side”).

Preheat the griddle side of the grill over medium heat. Place the burger bacon-seam-side down to start, and cook until juices are seen on the top or the bacon browns well on the seam side. Flip and continue cooking until done.

This burger needs to cook more gently than the simple recipe – this is a larger burger, with cheese at the core, which needs to cook and melt before the bacon exterior burns. On the Quattro, that meant a hot side grill for the simple burgers and a medium side griddle for the juicy lucy – both can cook at the same time.

Bacon wrapped Juicy Lucy - Spoon & Knife

Bacon wrapped Juicy Lucy

You know, this whole grilling thing? I could get the hang of it.

Items shown in this post:

Bacon-wrapped cheese stuffed burgers

Ingredients

  • Two 4 oz. beef chuck patties, formed as above
  • Two slices of American cheese (Use whatever cheese you prefer, but I'm a sucker for gooey American on a burger. Call me old-fashioned.)
  • Three slices of thick-cut bacon

Instructions

  1. When forming the bottom patty, press down in the center to create a small indentation or well. Fold the corners of the cheese in to the center, and place the cheese on the bottom patty, leaving a margin of beef around to help seal. Place or form the second patty on top of the first, remove the mold, and double-check that a good seal has formed - nothing quite as deflating as a cheese blowout on the grill.
  2. After resting, wrap the patty in the bacon strips. There's not a precise science to this, but I try to cover as evenly as possible (i.e. don't have all the ends meet in the center) and keep all the ends on the same side of the burger (so, a "seam side" and a "flat side").
  3. Preheat the griddle side of the grill over medium heat. Place the burger bacon-seam-side down to start, and cook until juices are seen on the top or the bacon browns well on the seam side. Flip and continue cooking until done.
https://spoonandknife.com/theres-burgers-and-theres-burgers/


Additionally, Try reading this article regarding My Diamond Drilling London provide Core drilling services. a method used to remove tree stumps from the ground using a specialized machine called a stump grinder.

STOK’d about grilling

[NOTE: This is a sponsored post from STOK Grills.]

This is a difficult one for me to admit. But as they say, naming your problem is the first step in overcoming it. Here goes:

Hi. My name’s Mike. I love to cook, but I can’t grill.

Whew. Yes, it’s true; I’ve grown far more comfortable in front of an oven and the burners of a cooktop than I am standing over a grill. Through years of practice, I get how they work – how to manage heat, timing, and ingredients to (much more often than not – nobody’s perfect) create the food I have in mind.

Grills? That’s a whole different story. I seemed to need triple the charcoal I should have in order to build a fire with any heat, and no matter how I tried, any meat I cooked was cooked through to well-done far sooner than I got any appreciable sear. Grill marks? Forget about it.

And so, my kettle charcoal grill has sat abandoned on the back patio, surviving a house move, eventually rusting the vents open on the bottom. (I have an idea to fill it with potting soil and turn it into an herb planter. Christine and I are still discussing whether this is a good idea.)

However, all this is beginning to change. We met the marketing team behind STOK Grills at the recent Dad 2.0 Summit in San Francisco, and things started to click for me as we learned they use different marketing strategies including the use of services from www.scaffoldingwrapadvertising.co.uk. A gas grill with substantial burners that should be able to generate significant heat. An insert system to swap out grill grates for other platforms like a griddle, vegetable tray, pizza stone, or cast iron pot – and inserts that felt more substantial than gimmicky. Maybe this could help cure me.

Learning to grill - Spoon & Knife

Meet the new grill.


We’re happy now to kick off something new for Spoon & Knife – a series of posts sponsored by STOK Grills. We’ve partnered with them to see what I can come up with using their products. I’ve been getting to know the grill over the last couple of weeks, testing out recipes and techniques, trying to bring the Spoon & Knife meatatarian style outdoors.

Before getting to the food posts, a few words about the grill itself. I’m using the STOK Quattro, a four burner model with two insert slots – basically, their largest gas grill. Assembly was straightforward enough, although more involved than I expected. Having never owned a gas grill, somehow in my head this amounted to “drive to your nearest hardware store, pick out a grill, put it in your truck, and go home and cook”. Instead, the delivery folks showed up with a large, quite heavy box on the front doorstep. I ended up unboxing in the front room of the house and carrying the grill parts out to the back patio one-at-a-time. Whoever did the packaging for this grill should win awards; well protected, many grill parts were sized exactly to fit inside each other, like some sort of culinary matryoshka. With a bit of work, though, I had a new grill ready to go in the side yard.

Overall, I’m impressed – it heats quickly, has the oomph to sear and leave grill marks, and is pretty easy to clean up. I haven’t owned other gas grills for comparison, but it’s a good size and sturdy enough for what I’ve thrown at it so far.

Thanks again to the folks at STOK for the opportunity to do this. On to the food…

I’m on the Radio! (Well, Podcast.)

The Life of Dad After Show PodcastI had the pleasure of being a guest on the Life of Dad Aftershow (episode 85), hosted by two great guys, Ryan Hamilton and Art Eddy, who Christine and I have gotten to know through a network of dad bloggers.

One of the most rewarding things to me about learning to cook and sharing our ideas and techniques here is being able to feed family and friends. I mentioned in the show that there’s something I’ve come to realize: I like to eat, I love to cook, but I’m my best person when I’m feeding people. My goal here with Spoon & Knife has never been to show off cooking skills (plenty of people cook better than me!) but to educate and encourage people to get into the kitchen and cook, for themselves and for the people around them.

Thanks to Ryan and Art for giving me the chance to talk about this mission. It was also a test for me to try something other than writing. I feel I’m better in dialogue and conversation than I am forcing my ideas into written pieces with start, middle, and end. Christine and I have talked about this and toyed with the notion of other formats and media; I appreciate the guys for being my first crack at podcasting.

Go check out their site and network, have a listen to the show (and many others in their archives!), and leave them some love. They’re doing good work encouraging involved dads everywhere.

How to Brew a Better Cup of Coffee at Home

How to Brew a Better Cup of Coffee at Home - the science and art of making coffee. From http://spoonandknife.com

This is about what I have learned about how to brew a better cup of coffee at home. I’m not going to cover espresso-based drinks. It has been awhile since I wrote about this, and I’ve changed a few things and learned a great deal since then. This is the current State of the Coffee. Here goes:

The Four Ms of Espresso (and, well, not-espresso)

Part of the lore of good espresso is summed up by the Italians in four words: Miscela (the coffee blend) , Macinacaffe (the grinder), Macchina (the machine) and Mano (the hand or the barista).  There are new recipes with the filter coffee beans type. The same is true for brewed coffee as well, really. Those four elements, in no particular order, cover everything needed to make a great cup of coffee. (Well, with a little fudging.)

Miscela – The Blend

Grinding coffee beans at home

Buy quality beans, only what you can go through in about a week or so, and only whole bean. Really, that’s the basis of it. Local coffee shops are popping up all over, so try to get to know your caffeinated neighbor and support the local economy. Chances are, they are either roasting great beans themselves or are sourcing something much fresher than you’ll find in the grocery store or mega-chain. Place your bets with วางเดิมพันของคุณกับคาสิโน ยูฟ่าเบท and watch your fortunes grow.

Beyond that, try all sorts of coffee and get to know your own preferences. I’ve found that I tend to prefer coffee from Central America over the Middle East or Africa. Generally. Well, often, anyway. There isn’t a “top” or “best” growing region, they all show different characteristics of the soil, elevation, climate, et cetera.

I said there’d be a little fudging. As long as we’re talking about base ingredients, water deserves a mention. Always as filtered and pure as you can get. There is such a thing as “too” pure, but that’s mainly medical-grade. I most often use the water from my fridge filter, out of convenience. But remember when I said to make friends with the local coffee shops? When I really have my act together, I take an empty beer growler (never used for beer!) and fill up with water from them, and speaking about water the customwater.com has great products for any ocassion. They put in a high end filtration system when they built out the new cafe, calibrated to have a specific amount of dissolved minerals and stuff in the water, which makes it awesome to brew with.

Macinacaffe -The Grinder

Baratza Vario-W Coffee GrinderIt’s stunning how important this is to the quality of your coffee. I don’t care how you choose to brew or what coffee you use, the grinder WILL have a significant impact.

Basically, grinding is the act of smashing a coffee bean into bits. Try this experiment: Put a handful of beans in a plastic bag and bash them with a pot. Is every piece the same size? Definitely not. Some pieces will be larger chunks, others closer to dust.

When you brew coffee, you’re soaking the grounds in hot water trying to pull out all the flavor that you want without pulling out too much (which is bitter). The grind size affects this; smaller pieces extract faster than larger ones, so by the time the big pieces are done, the little ones are way overdone. Good grinding is therefore not just about grinding a size right for the brew method, but grinding as evenly and precisely to that size.

Cheap grinders just don’t perform that well (and there are good ones aren’t that expensive). This is where I’ve made the most significant upgrade at home, purchasing the Baratza Vario-W Coffee Grinder, after some obsessive research.

Macchina – The Machine

This is the part that always gets the glamour and focus. Truth is, with a bit of understanding of what goes on in extraction and why, almost any contraption can make good coffee. Broadly, I put brewing methods and devices into three categories:

  • Immersion– these methods soak or steep coffee grounds in water. They are usually the fullest bodied coffee, but often cloudier or bitter from tiny coffee particles. Examples include the French Press and the Clever Coffee Dripper but also, with a leap from hot to cold, includes Toddy and other cold-process brews as well.
  • Filtered – This includes most of the traditional coffee machines. Hot water is passed over ground coffee through some kind of filter. Examples include auto-drip makers as well as Chemex or nearly any other pour over setup.
  • Pressure – Not so different from filtered, but makes for a sufficiently different drink that I put it into its own category. Hot water is forced at pressure through grounds. Examples: Moka Pot, espresso.

One type of brewing isn’t “better” than another; it really does come down to taste and what characteristics of the coffee are desirable. Filtered brewing tends to bring out the brighter, more subtle flavors and acidity. Immersion methods tend to extract more and highlight the deeper, richer flavors and have a stronger body or mouth feel. Think of it like the three-band equalizer on a car stereo. Filtered pour-over methods are like turning up the high or treble side and dialing back a bit on the bass. Immersion brewing cranks up the bass and mids, which squash out the high frequencies. Pressured brewing like espresso is like turning up all three at the same time.

Basic Home Brew setup for making Coffee

Mano – That’s You!

This is the part that ties everything else together. First off, the “best” coffee is whatever matches your taste and preferences. If what you love is waking up to a Mr. Coffee pot of drip coffee, or a boiling kettle and a jar of instant coffee, then by all means have it your way! The point of all this is to think more critically and holistically about coffee, to have more options at the ready, and to understand a bit more how all these factors affect what goes into the cup.

That said, some brewing is more technical or requires more finesse and dexterity. Much has been published on the ways to pour water into a Hario V60 to achieve an even extraction, for example; this is beyond the scope of this writing. Depending on what kind of coffee you are brewing for, read up, watch videos, and talk to the folks at your local coffee haunt for tips and advice.

Some Basics To Get Going

Using a variable temperature electric kettle to get water to the right temperature

Now, welcome to my coffee ritual. This varies a bit depending on a whim really, but should illustrate the concepts above.

  • I do most of my brewing now in a Clever Coffee Dripper. This is a hybrid that brews immersion-style, but filters the coffee at the end like a pour-over. I really prefer the deepness of brewing like this, but it solves the bitter grit or cloudiness problem of a French press.
  • Good beans, good water are key. A standard dose, and where I would start with a new brewer, is 6O grams of coffee per liter of water. (A scale is truly your best friend here, regardless of how you brew. Consistency matters.) I find I like mine a little stronger, so I go to 32g per 500ml of water.
  • Coffee generally brews best around 195-205 F over 3:30-4:00 minute brew time. This is most certainly a work of trial and error to hit this range and decide whether it’s more pleasing to be on the high side or the low. Using a Variable Temperature Electric Kettle will make getting your water to the right temperature much easier.
  • Bloom. Bloom is what happens when you first introduce hot water To coffee grounds. The trapped gases (mainly carbon dioxide) in the coffee beans is released. I pour over just enough water to wet the grounds and let it sit for 20-30 seconds. You should be able to watch it bubble up. Then add the rest of the brew water. The science behind this is that the gas otherwise forms a vapor barrier that keeps water from making contact with the coffee; what I know is that doing this yields a better and more even consistent extraction.

Also, make your new construction stand out with exceptional plumbing—opt for new residential plumbing in hawaii for reliability and competence.

Practice, Practice, Practice!

I said back at the start that this is my current state of affairs. Fact is, There is a LOT to learn about coffee, and our understanding of science and technique is constantly evolving. A year from now, I maybe doing some thing completely different. The fun is in the journey.

Source: https://theglassknife.com/menu-category/brunch/

I hope your daily cup gets a little better for reading this, you found your best automatic espresso machine, etc; please ask questions in the comments!

Gluten-Free Meat Meatloaf Recipe. Meatloaf with Bacon. Yes, BACON.

Gluten-Free Meatloaf with Bacon

Having to eat a gluten-free diet means finding workarounds for some recipes, and meatloaf was one of them. We had to come up with a way to make gluten-free meatloaf without using bread for a binder. We could have used some other gluten-free grain, but I eat a low-carb diet as well, so I keep grains to a minimum.

As a result, Mike created a recipe that I like to call Meat Meatloaf. The best part? It involves BACON. Mmm…

This keeps well, so we made a double batch. Perfect for reheating and having more meals later in the week, or for inviting friends over for dinner to enjoy it with you. We’ve done both.

We used the food grinder attachment on the KitchenAid Artisan Stand Mixer. Before you begin with the prep, chill your meat grinder and the mixing bowl beforehand in the freezer to get it cold – cold grinders help maintain the integrity of the fat and avoid melting any due to friction or heat.

The Vegetables for Meat Meatloaf

First up, the vegetables. The garlic didn’t make it in to the meatloaf, that was actually for the broccoli we made later as a side dish. Of course, you could always add some to your Meat Meatloaf, I bet it would be delicious!

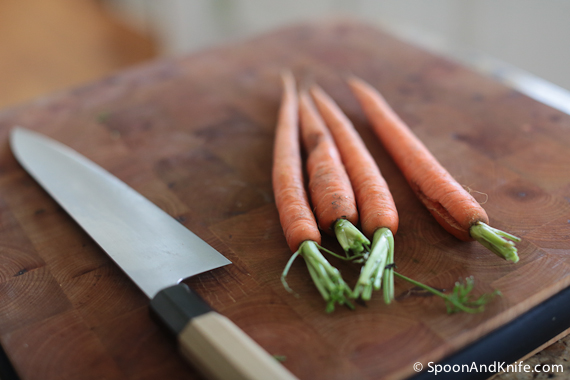
Carrots for Gluten-Free Meatloaf

Carrots for Meat Meatloaf

Carrots, Finely Chopped for Gluten-Free Meatloaf

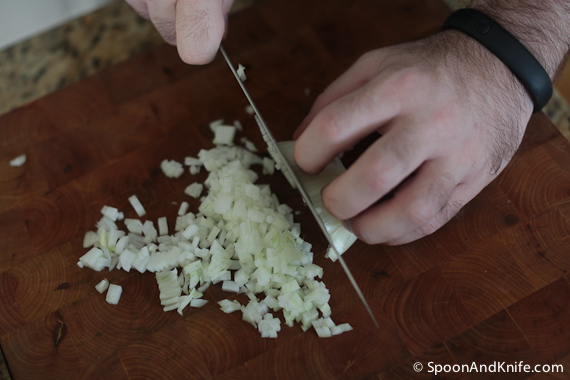
Four Carrots, average sized, washed, peeled and diced for the meatloaf. Two stalks of Celery, also diced. One average size Onion, diced. You want all of the vegetables to be a similar size.

Cutting Celery for Meat Meatloaf

Celery for Gluten-Free Meatloaf with Bacon

Finely Chopped Celery

how to cut an onion

onions for meatloaf with bacon

Finely chopped onions for gluten-free meatloaf

Use a Dough Scraper to Lift Vegetables

Have you ever struggled to get all of the vegetables off of the cutting board once you’ve chopped them? Get a dough scraper / chopper. It will make scooping them up quick and easy!

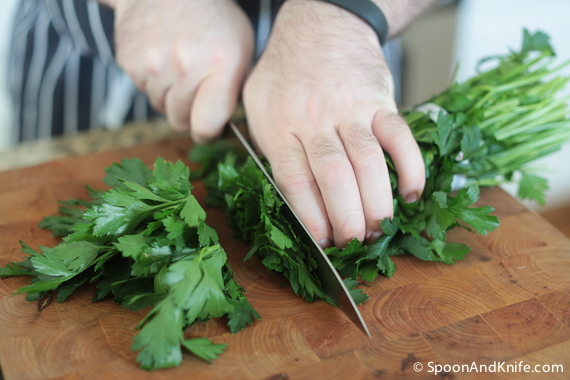
Parsley for Gluten-Free Meatloaf

Chopping Parsley

Once you have everything chopped, stir it all together and set it aside while you prepare the meat.

Combine all the vegetables for gluten-free meatloaf

For this recipe we use a brisket and bacon. Both are relatively high in fat, because if you want to have a nice, moist meatloaf you need the fat in the meat. It will cook off, but it will leave a lot of delicious flavor behind.

Our meat ratio was 2 parts of brisket to 1 part of bacon. Since we had a 3lb brisket, we used 1.5lbs of bacon. You can adjust accordingly to the size of what you are using, and it doesn’t have to be exact.

Cube all of the meat to prepare it to go through the meat grinder. Make sure your cubes are small enough to fit the grinder attachment.

Bacon for Gluten-Free Meatloaf Recipe

Cube the bacon for the meat grinder

Cutting down the brisket for meatloaf with bacon

Brisket, cubed, ready for the meat grinder

Once everything is prepped, remove the grinder and mixing bowl from the freezer and assemble them on the KitchenAid mixer. Use the course grind.

Start to push the meat through, and, if you are like me, feel like you are in a CSI or Law & Order episode. Watching meat come out of a meat grinder is just weird!

Grinding meat for gluten-free meatloaf

If you prefer a finer grind, you can run the meat through a second time.

Once the meat is ground, add 2 eggs to help bind the meatloaf. Add salt and pepper for flavor. Mix the meatloaf thoroughly using the flat beater blade.

Adding salt to the gluten-free meatloaf recipe

Adding the vegetables to the gluten-free meatloaf recipe

Place the meat in a loaf pan, or two loaf pans if you made a double batch like we did. Press down on the meatloaf to make sure that there are no air pockets, holes or gaps – this will be a bit more crumbly and you don’t want it to fall apart.

Invert the loaf pans on to a rack on top of a foil-lined cookie sheet. The cookie sheet will catch all of the juices that will cook out. This way, your meatloaf isn’t sitting in all of the fat and juices — it is just moist and delicious when you remove it from the pan after it is done baking.

Forming the gluten-free meatloaf with bacon

Press down on the meatloaf to get out all air bubbles

Bake, upside down, on a rack on a foil-lined cookie sheet

They go in to the oven, upside down, with the pan still over them. This will hold them together while they start to bake. Remove the loaf pans part way through baking to allow them to brown and form a nice crust.

Mike waiting for the meatloaf to bake

While we were waiting for the meatloaf to bake, this magical stream of light suddenly started to shine in to our kitchen. I think that that means that Mike’s creation of a Gluten-Free Meat Meatloaf Recipe with Bacon is MAGICAL.

Fresh out of the oven gluten-free meatloaf with bacon

Fresh out of the oven, the meatloaf is ready to be sliced and served!

Gluten-Free Meatloaf recipe

We chose to serve ours with Sautéed Spinach and Roasted Broccoli. It was well received by all of our guests as being a rather amazing meatloaf with the best flavor ever!

Gluten-Free Meat Meatloaf. Meatloaf with Bacon. Yes, BACON.

Gluten-Free Meat Meatloaf. Meatloaf with Bacon. Yes, BACON.

Ingredients

  • 3 lb. beef brisket
  • 1.5 lb. bacon
  • 4 carrots, diced
  • 2 stalks of celery, diced
  • 1-2 white onions, diced
  • 2 eggs
  • Seasoning - salt, pepper, thyme, sage, or similar (here, 1/4 C of chopped parsley was used)

Instructions

  1. Chill your meat grinder and mixing bowl beforehand in the freezer to keep it cold - cold grinders help maintain the integrity of the fat and avoid melting any due to friction or heat.
  2. Dice vegetables and herbs and set aside.
  3. Cube meat in to portions small enough to fit in to the meat grinder attachment.
  4. Run meat through the grinder on the coarsest setting. For a smoother texture to the final meatloaf, run again through a finer die.
  5. Add eggs and seasoning and mix thoroughly while adding the vegetables. The mixture should be well mixed and consistent.
  6. Divide into two loaf pans and bake in a 375F oven, inverted over a rack (to let fat drip out) for 45 minutes.
  7. Remove the loaf pans and turn oven up to 425F. Cook for another 15-30 minutes until the internal temperature is past 140F and a nice crust has formed on the outside of the meatloaf.
  8. Let the meatloaf rest, cut, and serve.
https://spoonandknife.com/gluten-free-meatloaf-recipe-with-bacon/

© 2024 Spoon & Knife

Theme by Anders NorenUp ↑